——本文以本地ISO镜像为例,说明Kickstart安装
Kickstart 给用户提供了一种自动化安装红帽企业Linux 的方法。Kickstart 文件可以存放于单一的服务器上,在安装过程中被独立的机器所读取。这个安装方法可以支持使用单一Kickstart 文件在多台机器上安装红帽企业版Linux。
Kickstart 安装可以使用本地光盘、本地硬盘驱动器,或通过NFS、FTP、HTTP 来执行。使用原版光盘内的文件即可制作一张Kickstart无人值守光盘。
- 安装kickstart 软件
#yum -y install system-config-kickstart
- 打开kickstart 工具配置ks 脚本
#system-config-kickstart &
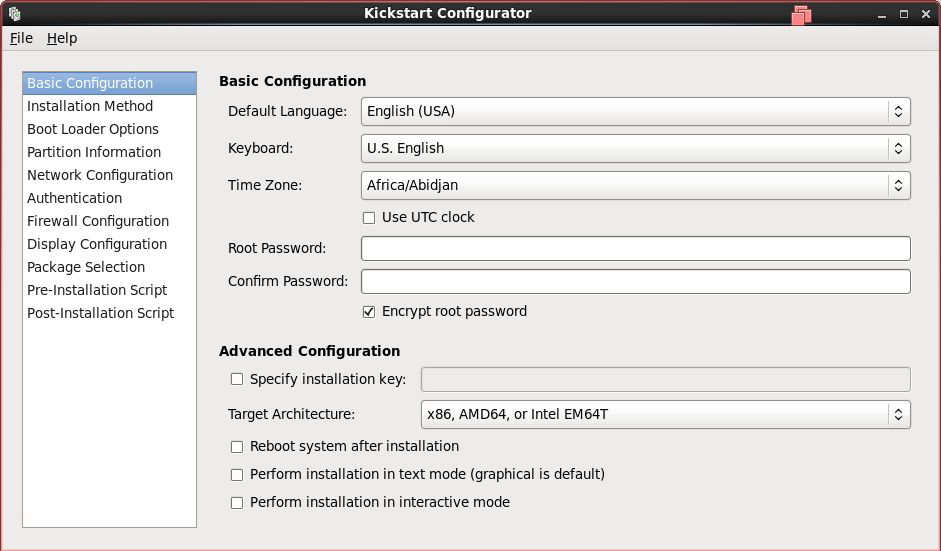
- 基本配置
指定root密码、安装方式、bootloader配置、分区配置、网络配置、认证配置、SELinux及防火墙、显示配置、安装的软件包、安装前脚本、安装后脚本。
配置完成后保存为文件即可(我在附录中附上了一个示例)。
- 配置isolinux
以/local/为本地光盘拷贝的根目录为例,进入修改/local/isolinux/isolinux.cfg,将第一行改为
default ks
在文件末尾添加
label ks
kernel vmlinuz
append ks=cdrom:/ks.cfg initrd=initrd.img
- 生成ISO镜像
将保存的Kickstart配置文件复制到/local/下,运行iso.sh脚本。脚本内容如下:
#/bin/sh!
mkisofs -v -R -J -joliet-long -ucs-level 3 -input-charset utf8 \
-V”rhel6.2_x86_64″ \
-c boot.cat -hide boot.cat -b isolinux/isolinux.bin \
-no-emul-boot -boot-load-size 4 -boot-info-table \
-o /root/myrhel6.2.iso /local/
其中,-o后的参数为输出文件,最后的目录为制作ISO镜像的源目录。
- 使用Kickstart光盘
使用镜像或刻录好的光盘引导启动主机,即可完成系统部署。
- 其他使用方法
制作好的Kickstart光盘或者原版光盘,在anaconda引导界面按ESC进入boot:提示符,输入linux ks=<kickstart config path>也可以按照所给的Kickstart配置进行无人值守安装(比如使用存放在可匿名访问的FTP服务器上的Kickstart配置文件),这样即可免去制作光盘的麻烦。
附录
ks.cfg
#platform=x86, AMD64, or Intel EM64T
#version=DEVEL
# Firewall configuration
firewall –disabled //防火墙设置
# Install OS instead of upgrade
install
# Use CDROM installation media
cdrom //安装源是否使用CDROM
# Root password
rootpw –iscrypted $1$FqrifQqR$n4.1vXH9d7z558nswOKVh1 //root密码(加密或明文)
# System authorization information
auth –useshadow –passalgo=sha512
# Use graphical install
graphical
firstboot –disable
# System keyboard
keyboard us //键盘布局
# System language
lang en_US //系统语言
# SELinux configuration
selinux –disabled //SELinux设置
# Installation logging level
logging –level=info
# Reboot after installation
reboot –eject //安装后重启,弹出光盘
# System timezone
timezone Asia/Shanghai //时区设置
# System bootloader configuration
bootloader –location=mbr
# Clear the Master Boot Record
zerombr
# Partition clearing information
clearpart –all –initlabel
# Disk partitioning information
part /boot –fstype=”ext4″ –size=200 //分区配置
part swap –fstype=”swap” –size=10240
part / –fstype=”ext4″ –grow –size=1
%packages //软件包
@base
@basic-desktop
@chinese-support
@client-mgmt-tools
@debugging
@desktop-debugging
@desktop-platform
@directory-client
@fonts
@general-desktop
@graphical-admin-tools
@input-methods
@internet-browser
@java-platform
@legacy-x
@network-file-system-client
@perl-runtime
@print-client
@remote-desktop-clients
@server-platform
@x11
%end
Post a Comment